
Until the Morning Breaks
A Simple Retro Lighting System
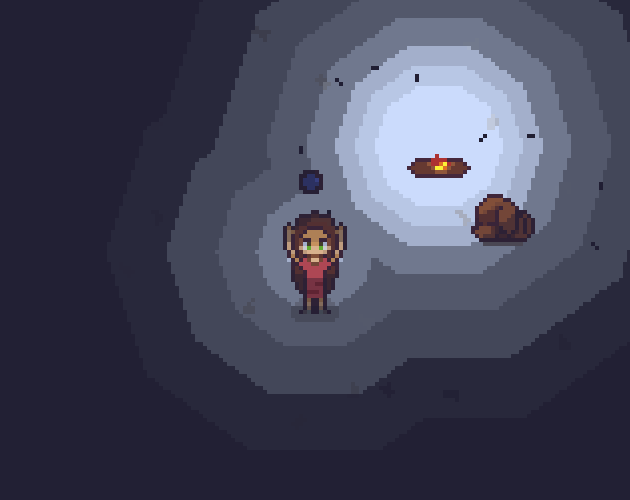
Lighting is a requirement for 3d games, but it can also really boost the style of any 2d game. It can breath life into that rushed game jam sprite art, adding depth to your characters and tile sets.
Unfortunately, not all game engines provide lighting systems that work in the 2d context, and those that do are often hard to customize to give your game that retro feel.
Overview
Using the Love2d engine, I achieved this effect using two canvases.
First draw the full game as normal onto Canvas A. Then, on Canvas B draw concentric rings of decreasing alpha, working outwards in. Finally draw Canvas B onto Canvas A.
There are three tricks to pull off drawing multiple “lights”
-
When drawing the concentric rings, set the blend mode to “replace”, rather than “alpha blend”, otherwise Canvas B would be just black.
-
Quantize the light into bands and make sure the levels for those bands are consistent between all lights.
-
For all “light” sources draw the same alpha level at the same time. If you draw all the rings for one light source and all the rings for another you end up drawing a Venn diagram of sorts. (Make sure you set the blend mode back to alpha mode, the default in love2d, before drawing Canvas B onto Canvas A).
Example
The following is an example lighting module for love2d. It’s broken into its draw call (to be called during love.draw), its update call, and its set-pos call (to be called whenever the light moves or changes its absolute intensity).
;; light.fnl

(local lights {})

(fn lights.draw [self camera]
  "Draw the lights to the canvas offset by x and y

   from camera. Returns a canvas."
  (local {: canvas : colour : rings : points} self)
  ;; push a new graphics operation onto the love2d graphics
  ;; stack. this ensures that any changes in this function,
  ;; such as changing the colour or blend mode do not blend
  ;; out to following function calls
  (love.graphics.push "all")
  (love.graphics.setColor 1 1 1 1)
  (love.graphics.setCanvas canvas)

  ;; Make sure you call clear `colour` with your desired
  ;; background colour. This is the fastest way to set the
  ;;  whole canvas to a single colour
  (love.graphics.clear colour)

  ;; Change the blend mode to replace. This replaces the full
  ;; colour value of the pixel, including the alpha value
  (love.graphics.setBlendMode :replace :premultiplied)

  ;; Destructure your background colour, ignoring the alpha
  ;; value
  (local [R G B _] self.colour)

  ;; Loop through all the light rings
  (each [_ [radius alpha] (ipairs rings)]
    ;; Set the colour to your background colour + the alpha
    ;; of the ring

    (love.graphics.setColor  R G B alpha)
    ;; Loop through each point of light destructuring the
    ;; table to access the required variables

    (each [_ {: x : y : radius-offset
              : time : period : amplitude}
           (pairs points)]

      ;; Modulate the amplitude in a breathing pattern
      ;; change ma function to change the breathing effect
      (local ma (* amplitude  ;; the normal amplitude
                   2  ;; double to account for the breathing
                   (math.abs (- time (/ period 2)))))

      ;; Define the standard radius, normalized to the
      ;; scale you are drawing the rest of you scene.
      (local sr (/ (+ ma radius radius-offset) camera.scale))

      ;; So long as the standardized radus is greater than
      ;; one you can go ahead and draw it onto the canvas
      (when (> sr 0)
        (love.graphics.circle "fill" ;; type of circle to draw
                              (+ x camera.x)
                              (+ y camera.y)
                              sr)))) ;; Radius

  ;; Pop the canvas to make sure that any changes
  ;; here don't bleed through
  (love.graphics.pop)

  ;; return the canvas you've drawn to
  canvas)

(fn lights.update [self dt]
  "Update the light timer."
  (local {: points} self)

  ;; Iterate through each point of light
  (each [_ point (pairs points)]
    (local time point.time)

    ;; increment time by dt
    (tset point :time (+ dt time))
    (when (> time point.period)

      ;; reset time to 0 if its greater than the period
      ;; this could be swapped to:
      ;; (math.max (- time period) period)
      ;; to account for overshoot and gc frame spikes
      (tset point :time 0))))

(fn lights.set-pos [self name obj]
  "Update the position and strength of the light.

Obj must have keys pos and a meta function strength."
  (local light (. self :points name))

  ;; Set the radius of the light
  (tset light :radius-offset (obj:strength))

  ;; Set the position of the light
  (tset light :x (+ obj.center.x obj.pos.x))
  (tset light :y (+ obj.center.y obj.pos.y)))

(local lights-mt {:__index lights
                  :set-pos lights.set-pos
                  :draw lights.draw
                  :update lights.update})

;; light {: x : y : radius-offest :time :period :amplitude}
(fn lights.new [canvas colour rings points]
  (setmetatable {: canvas : colour : rings : points}
                lights-mt))

lights
To test it out yourself you can use something similar to below. Note that this is not the ideal way to structure your project, but it is useful for testing out simple features like lighting.
;; your code for initializing your game state
(global state (game-state-init))

(love.init []
  ;; create the canvas
  (local light-canvas (love.graphics.newCanvas 1280 720))

  ;; set the interpolation to nearest, to keep pixels looking
  ;; like pixels
  (light-canvas:setFilter :nearest :nearest)

  ;; replace these with funtions to identify tables requiring
  ;; light sources in your game. They must have a key for:
  ;; `:pos {:x :y}` ,
  ;; `:center {:x :y}` and
  ;; a metafunction `strength`
  ;; that returns the standard radius of the light.
  (local player (get-player state))
  (local fire   (get-fire state))

  ;; The rings below are of the format `[radius alpha]`.
  ;; Play around with the number of rings, their radius
  ;; and their alpha until you have the light bands that
  ;; suit your game best
  (local rings [[300 0.99]
                [240 0.93]
                [190 0.88]
                [150 0.75]
                [120 0.4]
                [100 0.2]
                [80 0]])

  ;; Set the points where the lights should be,
  ;; in addition to their radius, and how much they
  ;; flicker (period amplitude)
  (local points {:player {:x (+ player.pos.x player.center.x)
                          :y (+ player.pos.y player.center.y)
                          :radius-offset (player:strength)
                          :time 0 :period 5 :amplitude 2}
                 :fire {:x (+ fire.pos.x fire.center.x)
                        :y (+ fire.pos.y fire.center.y)
                        :radius-offset (fire:strength)
                        :time 0 :period 5 :amplitude 2}})

  ;; Initialize the lights
  (local lights (lights.new final-light-canvas
                            [1 1 1 1]  ;; background colour
                            rings points)
  (tset state :lights lights))
)
Inspiration for this lighting system came from the Game Darkest Moon.
Leave a comment
Log in with itch.io to leave a comment.